SET UP PLEDGES
This tutorial will walk you through setting up the Advanced Fundraiser Setting of Pledges. If you have not yet set up your Basic Fundraiser Settings, then you will need to set up and save these settings first, before moving on to setting up pledges, because the settings found here are dependent on your basic setup of fundraiser options.
You can set up this initial fundraiser information from the Donation/Fundraising tab, under Setup, and Basic Setup.
For more information on the topic, please refer to How to Set Up Fundraising.
To find the Pledges setup page, open up the Fundraising tab, then go to Individual Fundraisers, and open up the Advanced Settings.

TABLE OF CONTENTS
- Setting Up Basic Donation Pledging
- ADDITIONAL DONATION PLEDGING SETTINGS
- ENABLING PLEDGES FOR ALL FUNDRAISERS AND TEAM FUNDRAISERS
- INSTRUCTING FUNDRAISERS ON ENABLING PLEDGES
- VIEWING AND MANAGING PLEDGES
- IMPORTING PLEDGES
Setting Up Basic Donation Pledging
Once on the Advanced Fundraiser Setup page, scroll down to the section for Donation Pledging Settings.
To enable Pledges, check off the box next to Allow donors to pledge donations to a fundraiser to be paid at a later time.

This will open up the pledge setup features for you.
First decide on the Pledge Type that you would like to use with your donations, by selecting one from the dropdown menu.
If you choose to do a Fixed Pledge Amount then this will allow users to enter in the one time Pledge Amount of their choosing, and confirm their pledge.

NOTE: When pledges are enabled, the Fixed Donation option will always be available, along with whichever Pledge Type you select here.
If you would like to allow users to do a pledge per variable, in addition to a one time fixed donation pledge, then you can select either Per lap,
which will allow users to make pledges that will be multiplied by the number of laps that a participant completes, Per mile, which will allow users to make pledges that will be multiplied by the number of miles that a participant completes, Per kilometer, which will allow users to make pledges that will be multiplied by the number of kilometers that a participant completes, or Per [Custom Text], which will allow users to make pledges that will be multiplied by the number of whichever custom variable you enter here is completed.
 |  |
 |  |
If you will be using the Per [CUSTOM TEXT] option, then you will need to enter in your custom text in it’s singular form, as well as in it’s plural form. For example: “obstacle” and “obstacles” / “beer consumed” and “beers consumed” / “daisy picked” and “daisies picked” / or “hippopotamus spotted” and “hippopotami spotted”.
 |  |
NOTE: Make sure that your singular form make sense when read as dollars per [blank], and your plural form makes sense when read as Final number of [blanks].
VERY IMPORTANT: When you are setting up your Pledge Type, you should be certain that this is the type that you definitely want to use with your race. If you decide to go back and switch the pledge type, AFTER fundraisers have already been enabling pledges under the existing pledge type, then this will throw off all of the existing pledge information.
For all of the Per [Unit] options (per lap, per mile, per kilometer, or per custom variable), you will find that some new fields opened up within this section.
When a donor enables pledges on their fundraiser, they will be asked to indicate their estimated minimum number of laps, miles, kilometers or custom text, as well as their estimated maximum number of laps, miles, kilometers or custom text.
This will allow the pledger to gauge what their overall donation will be once it is all calculated.
You can set the Default Estimated Minimum for the Per [Unit] option, as well as the Default Estimated Maximum for the Per [Unit] option, and whichever numbers you enter in here, will be the numbers that pre-fill the fields whenever a fundraiser goes through the process of Enabling Pledges.

Please note, that these default amounts are editable by the fundraiser.
If you would like to prevent fundraisers from editing your default amounts, then you can check off the box for Enforce Defaults and this will enforce these defaults for all fundraisers.
Similarly, you can also set specific defaults for Team Fundraisers, as well as enforce these defaults if needed.

Next, you will need to enter in an Expected Donation Date, and this will indicate the date when you would like for all pledges to be fulfilled by.

Please note, that this date is not binding, and is simply a preferred deadline for all pledge payments.
It important to note that all pledgers will continue to be able to make their payments online, even after this date passes. Also, all pledgers will continue to be able to make their payments online, even after your donation period has closed.
If you would like to Allow fundraisers to update the expected donation date on pledges, then you can check off the box to indicate this, and fundraisers will be given the option to Change the expected donation date for each pledger.

Please note, that regardless of whether you allow or restrict fundraisers to edit this information, you, as the race director, will still be able to indicate that a pledge was received from the dashboard, as is explained in the Viewing and Managing Pledges section of this video.
Lastly, if you would like to offer your pledgers the option to make their donations offline, then you can us the Offline Payment Instructions box to enter in instructions on where to send checks as well as indicate the information that should be included with the payment, such as the pledge ID.

Once you have your basic donation pledging settings customized to suit your race’s needs… then be sure to “Save the Settings”… and you will receive confirmation that your changes have been saved.

ADDITIONAL DONATION PLEDGING SETTINGS
Once you have your basic pledge settings customized, as was explained in the previous section, then you can move on to the Additional Settings section.
If you would like to Allow fundraisers to manually add pledges to their fundraiser, then you can check off the box to indicate this, and your fundraisers will have the option to Import Pledges into their fundraiser, if they received pledges offline.

If you would like to Include pledges in publicly listed donation totals and donor lists, then you can check off the box to indicate this, and all pledges, even those that have not yet been fulfilled, will be included in the total amount that is displayed publicly in places such as the donation thermometer and the scrolling list of donors.

If you would like to Allow fundraisers to mark that they received manual payment for a pledge and include [these] fundraiser received pledges in [the] publicly listed donation totals and donor lists, then you can check off the box to indicate this, and fundraisers will be given the option to Change whether or not they received this pledged donation.

NOTE: Regardless of whether you allow or restrict fundraisers to edit this information, you, as the race director, will still be able to indicate that a pledge was received from the dashboard, as is explained in the “Viewing and Managing Pledges” section of this video.
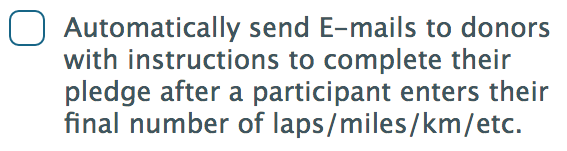
Finally, if you would like to Automatically send E-mails to donors with instructions to complete their pledge after a participant enters their final number of laps/miles/km/etc, then you can check off the box to indicate this, and all donors who made pledges will receive an email with instructions for completing their pledge to donate.
Once you have customized and reviewed all of your Donation Pledging Settings, then you can scroll down to the bottom of the page, and Save [the] Settings.
ENABLING PLEDGES FOR ALL FUNDRAISERS AND TEAM FUNDRAISERS
After you have pledges set up, then each fundraiser and fundraiser team will have the option to Enable Pledges, as will be explained in the upcoming section of this video.
However, if you would like to enable pledges for a fundraiser, then you can do so by going to the Donation tab of the dashboard, and viewing the Fundraisers.

If you would like to ONLY enable pledges for a SPECIFIC fundraiser and team fundraiser, then you can find that fundraiser or team fundraiser using the search fields, and then Edit the pledge settings.

After clicking Save Settings, the pledges will be enabled for that fundraiser or fundraiser team.

You also have the option to enable pledges for ALL of your fundraisers.
If you would like to enable pledges for all fundraisers and fundraiser teams at the same time, then you can simply open up the Actions dropdown, click on Enable Pledges for Fundraisers, fill out all of the applicable fields, and then Save Settings.

INSTRUCTING FUNDRAISERS ON ENABLING PLEDGES
After you have pledges set up, then each fundraiser and fundraiser team will have the option to Enable Pledges.
They can find this by logging into RunSignup, going to their Profile, selecting My Fundraisers, and then clicking Edit Fundraiser.
From here they can go to the Pledges tab, set their minimum and maximum estimations if applicable, and Enable Pledges.
After pledges are enabled, fundraisers will be able to Import Pledges from the same page, if applicable, and record their final number of the set variable, if applicable.
Please note that they will NOT be able to update this value after submitting this form.
VIEWING AND MANAGING PLEDGES
After pledges have been set up and enabled, and people have begun to support fundraisers with pledges, then you will be able to view and manage these pledges by going to the Donations tab of the dashboard, opening up Reports, and selecting Donation Pledges.

From here you can search your donation pledges by Pledge ID, First Name, Last Name, or Email.

Or you can scroll through your entire list of pledges manually.
You can also download this report by clicking on Download All as CSV.
The report found here will show you the number of pledges that have been made so far, as well the Maximum Donation Amount that has been pledged in total, and the Maximum Donation Amount Not Collected, which is the amount of the pledged donations that have not actually been donated yet.

For each pledge, you can click on Edit Pledge, and here you will be able to edit the pledger’s first name, last name, and email… their “on behalf of” field… whether or not the donation is being made anonymously… the pledge amount information… whether or not the fundraiser received the pledged donation… and the expected donation date.

If the pledger made a donation without using the pledge link that was provided to them, then you can use the Donation ID field to link their donation to the pledge.
And the Donation ID can be found under the Donations tab, in the Reports section, for Donations. By Searching for the donation, and then copying the Donation ID.
Also, if you need to delete a pledge, you can change the Pledge State from Active, to Deleted.

Whenever changes are made on this page, always be sure to Update [the] Pledge.

Also from the Donation Pledges report, you will have the option to Import Pledges. This feature will be explained in the following section for Importing Pledges.
IMPORTING PLEDGES
In order to Import Pledges, simply go to the Donations tab of the dashboard, open up Reports, and then Donation Pledges.

Scroll down to the bottom of the page, and click on the button for Import Pledges.

On the import page, you will have two options for importing pledges. You can either import pledges manually, or upload a CSV File of the pledges that need importing.
To import manually, simply fill out the required fields for each pledge.

To manually import more than one pledge, you can click on Add Another Pledge, and repeat the process as many times as you need.

Once finished, be sure to click Import Pledges, and you will receive confirmation that the pledge has been saved.

NOTE: You will need the Fundraiser ID for importing pledges. This can be found under the Donations tab, in the Fundraisers section, by searching for the Fundraiser, and copying the number displayed there.
If you have a long list of pledges to import, then you will likely want to upload a CSV File of the pledges to import.
TIP: To get a starting file to use for importing, simply go back to the Report for Donation Pledges, and then click Download the Existing report as a CSV. Once downloaded, open the file on your computer, and make sure that you delete all of the information from this report except for the header rows before importing it. You can then use this file to build your pledge import CSV file.
Once you have your CSV file created, return to the Import Pledges page, click Choose File, and upload your CSV. Map the fields from the CSV to the Import fields if necessary, and then click Continue.

If the First Row Contains Headers, then leave the following box selected. However, if the first row does not contain headers, then make sure this box is unchecked.

The import form will then be filled out to match your mapped CSV information, and you can also manually add additional pledges as explained previously, by clicking Add Another Pledge.
Once finished, be sure to click Import Pledges, and you will receive confirmation that the pledge has been saved.
